

Calligra Sheets · Printing and PDF output · Beginner
Fit a Wide Calligra Sheets Worksheet on One PDF Page
Define a print range, use landscape and one-page horizontal and vertical limits, then inspect the resulting PDF for clipping and tiny text.
Native-tested scoped in 25.04.2; documentation/source reviewed in 26.08.2 · Editorial standards
Open Format → Page Layout and set Scaling → Page limits to Horizontal 1 and Vertical 1, then define the intended print range after accepting Page Layout. Check orientation again in Print Preview and the PDF destination. The tested 25.04.2 workflow needed a separate preview Landscape selection. Fitting a sheet on one page can still make it too small to read.
Evidence and applicability: A complete one-page PDF was produced in Calligra Sheets 25.04.2 on Linux (Debian 13, Qt 6.8.2), with English UI and the default en_US environment, on October 16, 2026. The actual PDF was independently inspected for all six columns, 30 records, page bounds and readable 9-point text. ODS reopening did not retain the page-limit mode or column widths as expected. A separate corrected-order test verified saved print-range metadata; it did not produce a second PDF or test exclusion of unrelated cells. The documentation review uses official v26.08.2 source and handbook revision 2.7 dated March 11, 2013; v26.08.2 was not run.
Prepare a wide, checkable sample
Download the synthetic 30-row order report or create a sheet with Date, Customer, Item, Quantity, Unit Price and Total in A1:F1. The fixture contains 30 records, so its intended range is A1:F31. Its total amounts sum to 465. It is plain data rather than a formatted workbook; make the Customer and Item columns comfortably wide to exercise the layout settings. The successful native layout used Customer 5.8 cm, Item 4.5 cm, Date 90 pt, and the remaining columns 65 pt each. Use the column-header Resize Column dialog for precise widths rather than an uncontrolled drag.
Dates in this fixture are labels in ISO order. Verify import interpretation for your locale if you need actual date calculations. The CSV does not store page setup, formulas or print ranges. Generic import in the native test recognized its dates and displayed them as 14 Oct 2026.
Set up one-page output
- Activate only the sheet you want to print. Confirm the complete table occupies A1:F31, including its header and all 30 records.
- Open Format → Page Layout. The tested layout used ISO A4, Landscape, and 2 cm margins on every side. Paper size and column widths affect readability.
- On the Sheet page, find Scaling. Select Page limits, then set Horizontal to 1 and Vertical to 1. Fixed zoom is a different mode; a zoom percentage does not by itself enforce one page.
- Review grid, charts, objects, indicators, repeated rows/columns and header/footer settings. Include only what the report needs, then accept Page Layout with OK.
- Now select A1:F31 and choose Format → Print Range → Define Print Range. In the tested release, accepting Page Layout cleared an earlier print range. Defining the range after the final layout acceptance produced the saved range
Sheet1.A1:Sheet1.F31in a separate native check. If you revisit Page Layout, redefine and check the range afterward. Exclusion of unrelated cells was not tested here. - Choose File → Print Preview. Check orientation, all six columns and the final record, as well as the page count. In the native test, preview initially used Portrait despite the sheet’s Landscape setting; its Landscape toolbar control was needed to show the full table on one landscape page.
- Produce the PDF through the verified route below, then inspect the PDF itself. One page wide with unlimited height is not the same as one total page, and a one-page indicator does not prove the last columns are included.
The successful PDF used the whole populated A1:F31 area. It was produced before the separate print-range order check, so it does not establish that unrelated content outside a saved range would be excluded.
Select a screenshot to open the full-size image.
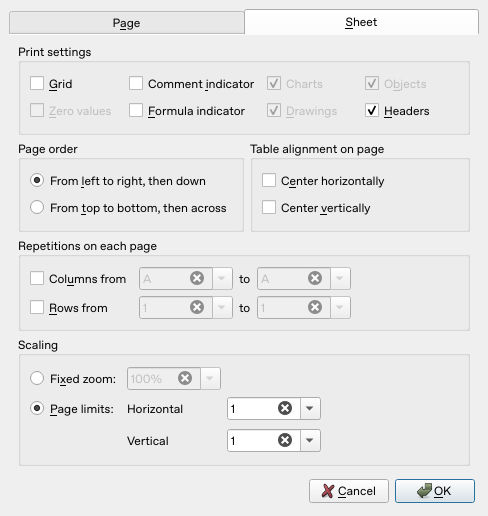
The native Sheet page has both page limits set to 1 before accepting Page Layout.
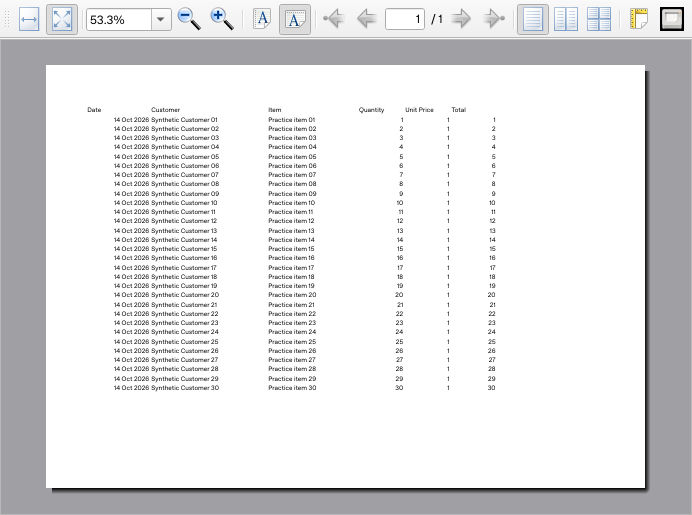
After explicitly choosing Landscape in the native preview, all six columns and records 01–30 fit on one page.
Choose the available PDF route
The tested route was Print Preview → Print → Print to File (PDF). Choose a new PDF filename and inspect the destination’s Properties before writing. In the native test, printer properties showed A4, Landscape and 20 mm margins on all sides. Confirm the destination is a local PDF file, not a physical printer.
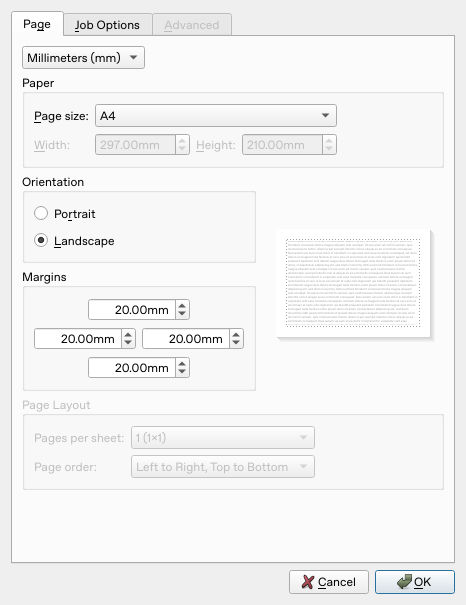
The PDF destination’s orientation was checked separately from the sheet layout. System print dialogs differ, so inspect the controls actually offered by your installation.
The shared application window also defines Export as PDF, but that direct action was not tested here. If no PDF destination/action is available, stop at preview until a supported route is available. Merely changing a filename extension to .pdf does not create a PDF.
Open the actual one-page native test PDF. It has one 842 × 595 pt landscape page, all six headings and all 30 records. Its Total column contains 1 through 30, independently summing to 465; no extra printed grand-total row was added. The native PDF was read-only inspected and rendered for legibility, not opened in a browser as part of this test.
Readability is a separate acceptance check
A page-count check is necessary but insufficient. Look for clipped headings, truncated customer names, missing final rows and numbers that are too small to distinguish. Compare the PDF with A1:F31 and independently check the Total column: 465.
If one-page output is illegible, first remove unused columns, shorten unnecessarily wide headings, use landscape and choose suitable paper. If the report still cannot be read, relax the requirement: keep Horizontal at 1 and set Vertical to No Limit. For a multipage alternative, configure the header row under Repetitions on each page and inspect every page. Repeating printed headings is separate from any on-screen scrolling behavior.
Recheck settings after reopening
The tested ODS retained landscape A4 and 2 cm margins after reopening, but the Sheet page showed Fixed zoom 100% and disabled Page limits rather than the earlier 1-by-1 limits. Customer and Item columns also reopened narrower. The saved file contained the earlier page-limit and width settings, so do not treat a successful save as proof that the reopened application will reproduce them.
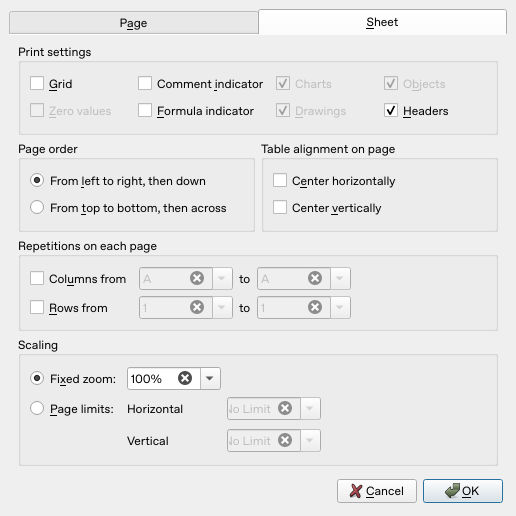
This is the actual reopened scaling state, not the intended setup. Before producing another PDF, recheck widths, reapply layout and page limits as needed, redefine the print range after accepting Page Layout, then inspect both preview and output again. The separate range-order check saved the correct range but was not reopened or used for a second PDF. Repeated headings and the multipage alternative above remain documentation-based, untested branches.
Troubleshooting
- Extra pages: recheck both page limits, print range, paper size and which sheets are included, especially after reopening.
- Unexpected content: the print range or selected sheet may be wrong; review before printing.
- Missing text: inspect hidden rows/columns and cell-level Do not print text settings.
- PDF differs from preview: compare the destination’s paper size, margins and range. The final PDF is the deliverable to approve.
- Existing settings are confusing: save a copy before changing them; do not reset a shared report blindly.
See create a chart for a visual summary and SUM for checking report totals.
Official evidence
-
v26.08.2 Page Layout dialog and Sheet-page controls: independent horizontal/vertical page limits.
-
v26.08.2 sheet printing and application window printing/PDF actions.
-
v25.04.2 Page Layout settings, settings replacement, default print region and ODS print-range serialization support the corrected range-after-layout order.